You can order print and ebook versions of Think Python 3e from Bookshop.org and Amazon.
16. Classes and Objects#
At this point we have defined classes and created objects that represent the time of day and the day of the year. And we’ve defined methods that create, modify, and perform computations with these objects.
In this chapter we’ll continue our tour of object-oriented programming (OOP) by defining classes that represent geometric objects, including points, lines, rectangles, and circles.
We’ll write methods that create and modify these objects, and we’ll use the jupyturtle module to draw them.
I’ll use these classes to demonstrate OOP topics including object identity and equivalence, shallow and deep copying, and polymorphism.
16.1. Creating a Point#
In computer graphics a location on the screen is often represented using a pair of coordinates in an x-y plane.
By convention, the point (0, 0) usually represents the upper-left corner of the screen, and (x, y) represents the point x units to the right and y units down from the origin.
Compared to the Cartesian coordinate system you might have seen in a math class, the y axis is upside-down.
There are several ways we might represent a point in Python:
We can store the coordinates separately in two variables,
xandy.We can store the coordinates as elements in a list or tuple.
We can create a new type to represent points as objects.
In object-oriented programming, it would be most idiomatic to create a new type.
To do that, we’ll start with a class definition for Point.
class Point:
    """Represents a point in 2-D space."""

    def __init__(self, x, y):
        self.x = x
        self.y = y

    def __str__(self):
        return f'Point({self.x}, {self.y})'
The __init__ method takes the coordinates as parameters and assigns them to attributes x and y.
The __str__ method returns a string representation of the Point.
Now we can instantiate and display a Point object like this.
start = Point(0, 0)
print(start)
Point(0, 0)
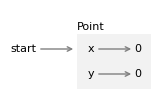
The following diagram shows the state of the new object.

As usual, a programmer-defined type is represented by a box with the name of the type outside and the attributes inside.
In general, programmer-defined types are mutable, so we can write a method like translate that takes two numbers, dx and dy, and adds them to the attributes x and y.
%%add_method_to Point

    def translate(self, dx, dy):
        self.x += dx
        self.y += dy
This function translates the Point from one location in the plane to another.
If we don’t want to modify an existing Point, we can use copy to copy the original object and then modify the copy.
from copy import copy

end1 = copy(start)
end1.translate(300, 0)
print(end1)
Point(300, 0)
We can encapsulate those steps in another method called translated.
%%add_method_to Point

    def translated(self, dx=0, dy=0):
        point = copy(self)
        point.translate(dx, dy)
        return point
In the same way that the sort method modifies a list and the sorted function creates a new list, now we have a translate method that modifies a Point and a translated method that creates a new one.
Here’s an example:
end2 = start.translated(0, 150)
print(end2)
Point(0, 150)
In the next section, we’ll use these points to define and draw a line.
16.2. Creating a Line#
Now let’s define a class that represents the line segment between two points.
As usual, we’ll start with an __init__ method and a __str__ method.
class Line:
    def __init__(self, p1, p2):
        self.p1 = p1
        self.p2 = p2

    def __str__(self):
        return f'Line({self.p1}, {self.p2})'
With those two methods, we can instantiate and display a Line object we’ll use to represent the x axis.
line1 = Line(start, end1)
print(line1)
Line(Point(0, 0), Point(300, 0))
When we call print and pass line as a parameter, print invokes __str__ on line.
The __str__ method uses an f-string to create a string representation of the line.
The f-string contains two expressions in curly braces, self.p1 and self.p2.
When those expressions are evaluated, the results are Point objects.
Then, when they are converted to strings, the __str__ method from the Point class gets invoked.
That’s why, when we display a Line, the result contains the string representations of the Point objects.
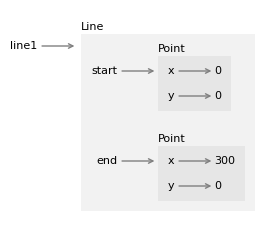
The following object diagram shows the state of this Line object.

String representations and object diagrams are useful for debugging, but the point of this example is to generate graphics, not text!
So we’ll use the jupyturtle module to draw lines on the screen.
As we did in Chapter 4, we’ll use make_turtle to create a Turtle object and a small canvas where it can draw.
To draw lines, we’ll use two new functions from the jupyturtle module:
jumpto, which takes two coordinates and moves theTurtleto the given location without drawing a line, andmoveto, which moves theTurtlefrom its current location to the given location, and draws a line segment between them.
Here’s how we import them.
from jupyturtle import make_turtle, jumpto, moveto
And here’s a method that draws a Line.
%%add_method_to Line

    def draw(self):
        jumpto(self.p1.x, self.p1.y)
        moveto(self.p2.x, self.p2.y)
To show how it’s used, I’ll create a second line that represents the y axis.
line2 = Line(start, end2)
print(line2)
Line(Point(0, 0), Point(0, 150))
And then draw the axes.
make_turtle()
line1.draw()
line2.draw()
As we define and draw more objects, we’ll use these lines again. But first let’s talk about object equivalence and identity.
16.3. Equivalence and identity#
Suppose we create two points with the same coordinates.
p1 = Point(200, 100)
p2 = Point(200, 100)
If we use the == operator to compare them, we get the default behavior for programmer-defined types – the result is True only if they are the same object, which they are not.
p1 == p2
False
If we want to change that behavior, we can provide a special method called __eq__ that defines what it means for two Point objects to be equal.
%%add_method_to Point

def __eq__(self, other):
    return (self.x == other.x) and (self.y == other.y)
This definition considers two Points to be equal if their attributes are equal.
Now when we use the == operator, it invokes the __eq__ method, which indicates that p1 and p2 are considered equal.
p1 == p2
True
But the is operator still indicates that they are different objects.
p1 is p2
False
It’s not possible to override the is operator – it always checks whether the objects are identical.
But for programmer-defined types, you can override the == operator so it checks whether the objects are equivalent.
And you can define what equivalent means.
16.4. Creating a Rectangle#
Now let’s define a class that represents and draws rectangles. To keep things simple, we’ll assume that the rectangles are either vertical or horizontal, not at an angle. What attributes do you think we should use to specify the location and size of a rectangle?
There are at least two possibilities:
You could specify the width and height of the rectangle and the location of one corner.
You could specify two opposing corners.
At this point it’s hard to say whether either is better than the other, so let’s implement the first one. Here is the class definition.
class Rectangle:
    """Represents a rectangle.

    attributes: width, height, corner.
    """
    def __init__(self, width, height, corner):
        self.width = width
        self.height = height
        self.corner = corner

    def __str__(self):
        return f'Rectangle({self.width}, {self.height}, {self.corner})'
As usual, the __init__ method assigns the parameters to attributes and the __str__ returns a string representation of the object.
Now we can instantiate a Rectangle object, using a Point as the location of the upper-left corner.
corner = Point(30, 20)
box1 = Rectangle(100, 50, corner)
print(box1)
Rectangle(100, 50, Point(30, 20))
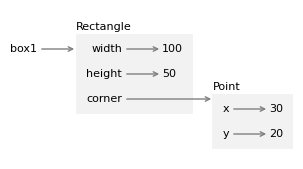
The following diagram shows the state of this object.

To draw a rectangle, we’ll use the following method to make four Point objects to represent the corners.
%%add_method_to Rectangle

    def make_points(self):
        p1 = self.corner
        p2 = p1.translated(self.width, 0)
        p3 = p2.translated(0, self.height)
        p4 = p3.translated(-self.width, 0)
        return p1, p2, p3, p4
Then we’ll make four Line objects to represent the sides.
%%add_method_to Rectangle

    def make_lines(self):
        p1, p2, p3, p4 = self.make_points()
        return Line(p1, p2), Line(p2, p3), Line(p3, p4), Line(p4, p1)
Then we’ll draw the sides.
%%add_method_to Rectangle

    def draw(self):
        lines = self.make_lines()
        for line in lines:
            line.draw()
Here’s an example.
make_turtle()
line1.draw()
line2.draw()
box1.draw()
The figure includes two lines to represent the axes.
16.5. Changing rectangles#
Now let’s consider two methods that modify rectangles, grow and translate.
We’ll see that grow works as expected, but translate has a subtle bug.
See if you can figure it out before I explain.
grow takes two numbers, dwidth and dheight, and adds them to the width and height attributes of the rectangle.
%%add_method_to Rectangle

    def grow(self, dwidth, dheight):
        self.width += dwidth
        self.height += dheight
Here’s an example that demonstrates the effect by making a copy of box1 and invoking grow on the copy.
box2 = copy(box1)
box2.grow(60, 40)
print(box2)
Rectangle(160, 90, Point(30, 20))
If we draw box1 and box2, we can confirm that grow works as expected.
make_turtle()
line1.draw()
line2.draw()
box1.draw()
box2.draw()
Now let’s see about translate.
It takes two numbers, dx and dy, and moves the rectangle the given distances in the x and y directions.
%%add_method_to Rectangle

    def translate(self, dx, dy):
        self.corner.translate(dx, dy)
To demonstrate the effect, we’ll translate box2 to the right and down.
box2.translate(30, 20)
print(box2)
Rectangle(160, 90, Point(60, 40))
Now let’s see what happens if we draw box1 and box2 again.
make_turtle()
line1.draw()
line2.draw()
box1.draw()
box2.draw()
It looks like both rectangles moved, which is not what we intended! The next section explains what went wrong.
16.6. Deep copy#
When we use copy to duplicate box1, it copies the Rectangle object but not the Point object it contains.
So box1 and box2 are different objects, as intended.
box1 is box2
False
But their corner attributes refer to the same object.
box1.corner is box2.corner
True
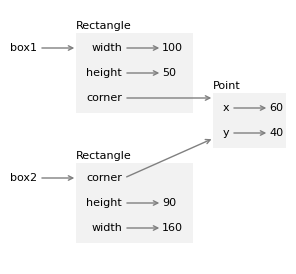
The following diagram shows the state of these objects.

What copy does is called a shallow copy because it copies the object but not the objects it contains.
As a result, changing the width or height of one Rectangle does not affect the other, but changing the attributes of the shared Point affects both!
This behavior is confusing and error-prone.
Fortunately, the copy module provides another function, called deepcopy, that copies not only the object but also the objects it refers to, and the objects they refer to, and so on.
This operation is called a deep copy.
To demonstrate, let’s start with a new Rectangle that contains a new Point.
corner = Point(20, 20)
box3 = Rectangle(100, 50, corner)
print(box3)
Rectangle(100, 50, Point(20, 20))
And we’ll make a deep copy.
from copy import deepcopy

box4 = deepcopy(box3)
We can confirm that the two Rectangle objects refer to different Point objects.
box3.corner is box4.corner
False
Because box3 and box4 are completely separate objects, we can modify one without affecting the other.
To demonstrate, we’ll move box3 and grow box4.
box3.translate(50, 30)
box4.grow(100, 60)
And we can confirm that the effect is as expected.
make_turtle()
line1.draw()
line2.draw()
box3.draw()
box4.draw()
16.7. Polymorphism#
In the previous example, we invoked the draw method on two Line objects and two Rectangle objects.
We can do the same thing more concisely by making a list of objects.
shapes = [line1, line2, box3, box4]
The elements of this list are different types, but they all provide a draw method, so we can loop through the list and invoke draw on each one.
make_turtle()

for shape in shapes:
    shape.draw()
The first and second time through the loop, shape refers to a Line object, so when draw is invoked, the method that runs is the one defined in the Line class.
The third and fourth time through the loop, shape refers to a Rectangle object, so when draw is invoked, the method that runs is the one defined in the Rectangle class.
In a sense, each object knows how to draw itself. This feature is called polymorphism. The word comes from Greek roots that mean “many shaped”. In object-oriented programming, polymorphism is the ability of different types to provide the same methods, which makes it possible to perform many computations – like drawing shapes – by invoking the same method on different types of objects.
As an exercise at the end of this chapter, you’ll define a new class that represents a circle and provides a draw method.
Then you can use polymorphism to draw lines, rectangles, and circles.
16.8. Debugging#
In this chapter, we ran into a subtle bug that happened because we created a Point that was shared by two Rectangle objects, and then we modified the Point.
In general, there are two ways to avoid problems like this: you can avoid sharing objects or you can avoid modifying them.
To avoid sharing objects, you can use deep copy, as we did in this chapter.
To avoid modifying objects, consider replacing impure functions like translate with pure functions like translated.
For example, here’s a version of translated that creates a new Point and never modifies its attributes.
    def translated(self, dx=0, dy=0):
        x = self.x + dx
        y = self.y + dy
        return Point(x, y)
Python provides features that make it easier to avoid modifying objects. They are beyond the scope of this book, but if you are curious, ask a virtual assistant, “How do I make a Python object immutable?”
Creating a new object takes more time than modifying an existing one, but the difference seldom matters in practice. Programs that avoid shared objects and impure functions are often easier to develop, test, and debug – and the best kind of debugging is the kind you don’t have to do.
16.9. Glossary#
shallow copy: A copy operation that does not copy nested objects.
deep copy: A copy operation that also copies nested objects.
polymorphism: The ability of a method or operator to work with multiple types of objects.
16.10. Exercises#
# This cell tells Jupyter to provide detailed debugging information
# when a runtime error occurs. Run it before working on the exercises.

%xmode Verbose
16.10.1. Ask a virtual assistant#
For all of the following exercises, consider asking a virtual assistant for help.
If you do, you’ll want include as part of the prompt the class definitions for Point, Line, and Rectangle – otherwise the VA will make a guess about their attributes and functions, and the code it generates won’t work.
16.10.2. Exercise#
Write an __eq__ method for the Line class that returns True if the Line objects refer to Point objects that are equivalent, in either order.
You can use the following outline to get started.
%%add_method_to Line

def __eq__(self, other):
    return None
You can use these examples to test your code.
start1 = Point(0, 0)
start2 = Point(0, 0)
end = Point(200, 100)
This example should be True because the Line objects refer to Point objects that are equivalent, in the same order.
line_a = Line(start1, end)
line_b = Line(start2, end)
line_a == line_b    # should be True
True
line_c = Line(end, start1)
line_a == line_c     # should be True
True
Equivalence should always be transitive – that is, if line_a and line_b are equivalent, and line_a and line_c are equivalent, then line_b and line_c should also be equivalent.
line_b == line_c # should be True
True
This example should be False because the Line objects refer to Point objects that are not equivalent.
line_d = Line(start1, start2)
line_a == line_d    # should be False
False
16.10.3. Exercise#
Write a Line method called midpoint that computes the midpoint of a line segment and returns the result as a Point object.
You can use the following outline to get started.
%%add_method_to Line

    def midpoint(self):
        return Point(0, 0)
You can use the following examples to test your code and draw the result.
start = Point(0, 0)
end1 = Point(300, 0)
end2 = Point(0, 150)
line1 = Line(start, end1)
line2 = Line(start, end2)
mid1 = line1.midpoint()
print(mid1)
Point(150.0, 0.0)
mid2 = line2.midpoint()
print(mid2)
Point(0.0, 75.0)
line3 = Line(mid1, mid2)
make_turtle()

for shape in [line1, line2, line3]:
    shape.draw()
16.10.4. Exercise#
Write a Rectangle method called midpoint that find the point in the center of a rectangle and returns the result as a Point object.
You can use the following outline to get started.
%%add_method_to Rectangle

    def midpoint(self):
        return Point(0, 0)
You can use the following example to test your code.
corner = Point(30, 20)
rectangle = Rectangle(100, 80, corner)
mid = rectangle.midpoint()
print(mid)
Point(80.0, 60.0)
diagonal = Line(corner, mid)
make_turtle()

for shape in [line1, line2, rectangle, diagonal]:
    shape.draw()
16.10.5. Exercise#
Write a Rectangle method called make_cross that:
Uses
make_linesto get a list ofLineobjects that represent the four sides of the rectangle.Computes the midpoints of the four lines.
Makes and returns a list of two
Lineobjects that represent lines connecting opposite midpoints, forming a cross through the middle of the rectangle.
You can use this outline to get started.
%%add_method_to Rectangle

    def make_diagonals(self):
        return []
You can use the following example to test your code.
corner = Point(30, 20)
rectangle = Rectangle(100, 80, corner)
lines = rectangle.make_cross()
make_turtle()

rectangle.draw()
for line in lines:
    line.draw()
16.10.6. Exercise#
Write a definition for a class named Circle with attributes center and radius, where center is a Point object and radius is a number.
Include special methods __init__ and a __str__, and a method called draw that uses jupyturtle functions to draw the circle.
You can use the following function, which is a version of the circle function we wrote in Chapter 4.
from jupyturtle import make_turtle, forward, left, right
import math

def draw_circle(radius):
    circumference = 2 * math.pi * radius
    n = 30
    length = circumference / n
    angle = 360 / n
    left(angle / 2)
    for i in range(n):
        forward(length)
        left(angle)
You can use the following example to test your code.
We’ll start with a square Rectangle with width and height 100.
corner = Point(20, 20)
rectangle = Rectangle(100, 100, corner)
The following code should create a Circle that fits inside the square.
center = rectangle.midpoint()
radius = rectangle.height / 2

circle = Circle(center, radius)
print(circle)
Circle(Point(70.0, 70.0), 50.0)
If everything worked correctly, the following code should draw the circle inside the square (touching on all four sides).
make_turtle(delay=0.01)

rectangle.draw()
circle.draw()
Copyright 2024 Allen B. Downey
Code license: MIT License
Text license: Creative Commons Attribution-NonCommercial-ShareAlike 4.0 International